OpenCart Blog Integration – A Complete Tutorial to Installing a Blog to Your Online Store
 OpenCart is easily one of the best opensource shopping carts you can use for your online store whether you have your own products or dropship. The interface is very userfriendly and you can literally get started selling products in a few hours or less.
However, the OpenCart platform is only designed as a CMS for adding products and creating a nice store but it lacks one feature that distinguishes many of the most successful websites: a blog.
Can’t I just install WordPress?
You might be thinking to yourself that you can simply install a WordPress blog to another directory on the site (i.e. site.com/blog) or even as a new subdomain (i.e. blog.site.com) but the downside is that the WordPress blog becomes its own instance and there is no clear integration between the blog and the shopping cart.
The best solution then is for an OpenCart blog integration that integrates the power of an online shopping cart combined with a blog module that perfectly blends everything together.
Why Add a Blog to an Online Store?
Online stores can still be very successful on their own but adding a blog to the site with content added on a daily basis helps with bringing in more traffic and sales.
Having a blog:
1. Builds trust and credibility with new customers by providing additional value through content marketing.
2. Gets traffic from the search engines from searchers looking for information about the products or services you sell.
3. Markets your brand online thereby making it more likely that a customer will return.
4. Shares your content through social media networks such as Facebook and Twitter.
5. Distinguishes your business from the competition.
With search engines such as Google constantly updating their algorithms, having a blog also helps with ensuring your business doesn’t suffer as a result. Using content marketing in your strategy means that you can build a loyal customer base that you can market to again and again and withstand any algorithm updates.
So now that you know the importance of having a blog, following is a complete guide to adding your own blog to your OpenCart online store. This tutorial assumes that you are somewhat technically savvy but even if you aren’t, there are also details below for how you can contact me to do it for for you with a small charge along with a special offer with my SEO content writing services.
For the purposes of this demo and to provide better screenshots for your reference, I will be using the domain at http://opencartblogdemo.com.
Before Getting Started
For this tutorial, I assume that you already have your own eCommerce store set up. As this is a tutorial for OpenCart, I will also be assuming that you have OpenCart installed as well.
What you need
OpenCart Blog Manager – As mentioned above, OpenCart does not have its own blog extension that comes out of the box. I strongly recommend this blog module and is the one I will be using for this tutorial. There are others available but I like this extension because it’s easy to install and it integrates well with the front end of the store. Check out the demo here.
Keep in mind that you’ll need to purchase it through OpenCart.com so an account there is necessary before you can download it. Once the purchase is complete, be sure to place it in a folder where you can be able to access it as we will be using FTP to transfer the files over. Cost: $35
vQmod – Installing vQmod is essential to running this module as it allows you to make modifications to the store without modifying core files. I won’t be going over how to install this as it is pretty straightforward but if you need help then be sure to check out this tutorial on how to install vQmod.
FTP Program – You’ll need an FTP program so that you can transfer the necessary files to install a blog manager to your OpenCart store. I prefer CoreFTP as it does everything I need it to without being overly complicated.
Now that we have all that out of the way, let’s get started!
1. Turn On SEO URLs
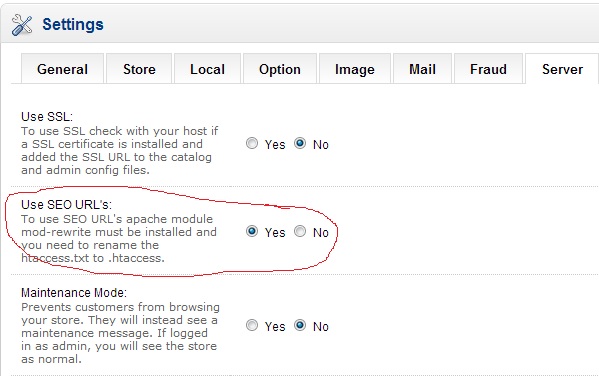
As I was writing this tutorial, I became extremely frustrated that the blog wasn’t properly displaying! I was using a brand new installation of OpenCart so naturally all the settings were set to default. I managed to figure out the problem which is why I’m putting this as the first step. You won’t be able to view your blog until you change your SEO URL settings.
In the backoffice, go to System > Settings > Click Edit for the main store > Click the Server tab > Where it says “Use SEO URL’s” change it to Yes and click Save.
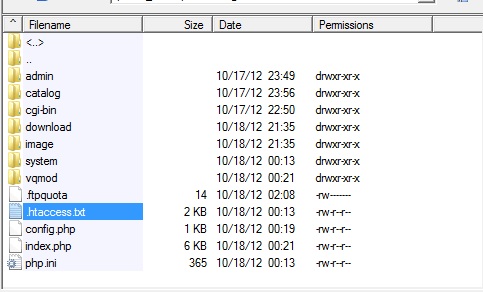
As the instructions suggest, you’ll also need to rename the .htaccess.txt to .htaccess which can easily be done using an FTP program.
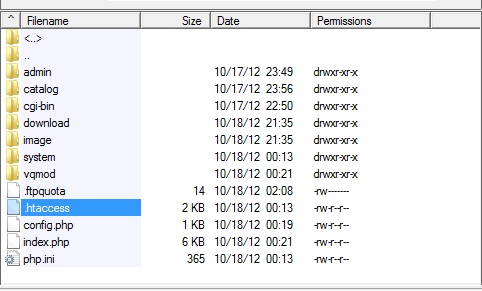
Then change it to .htaccess (simply remove the .txt part).
Now your OpenCart store is ready to go and we can get started with adding a blog.
2. Upload Blog Manager files
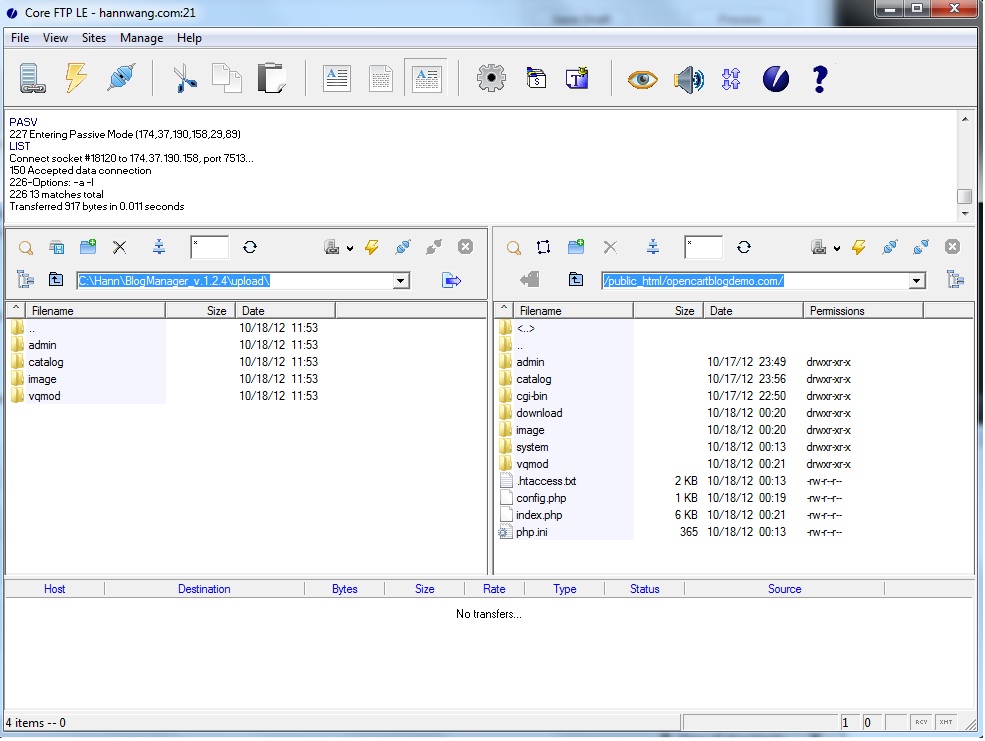
From the /upload folder, simply move all files over to your site directory using your favorite FTP program. See the screenshot below for more details:
3. Change User Settings
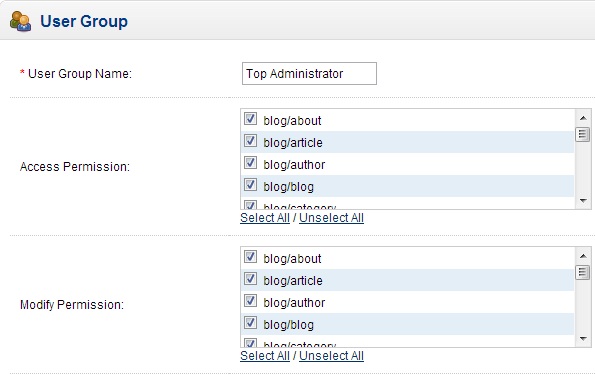
The next step is to set the group permission on your Users so they are able to access and modify the Blog Manager and related modules.
Go to Settings > Users > User Groups > Top Administrator (Click the Edit button) > Click Select All for Access Permission and Modify Permission > Save changes
4. Install Blog Manager
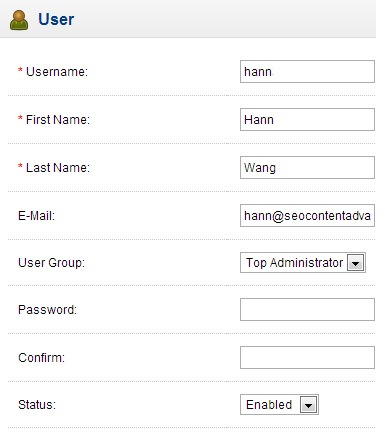
Then go to System > User > Edit User > The Firstname and Lastname fields must have data > Click Save
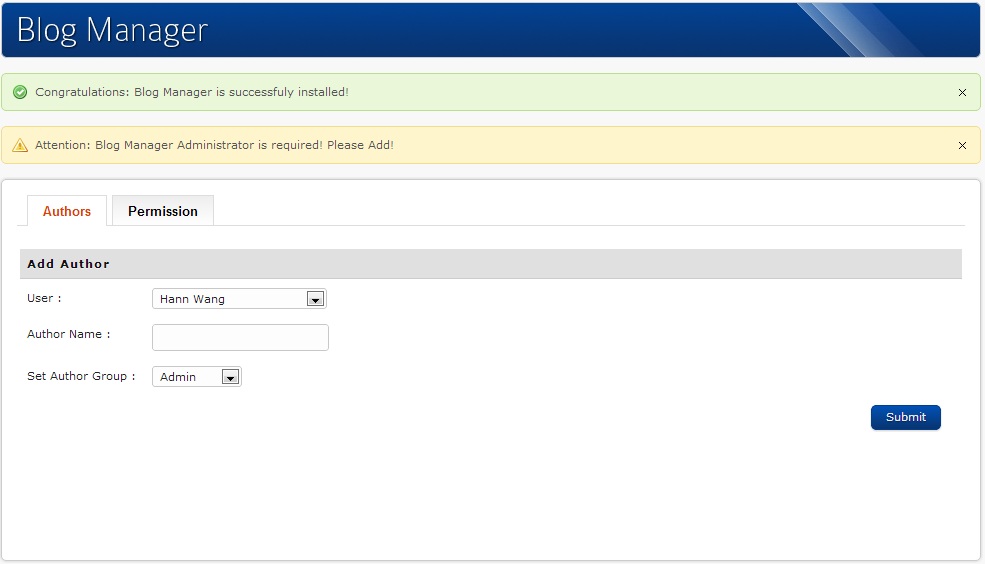
Then go to Extensions > Install Blog Manager
If all goes well, you should see the following success message:
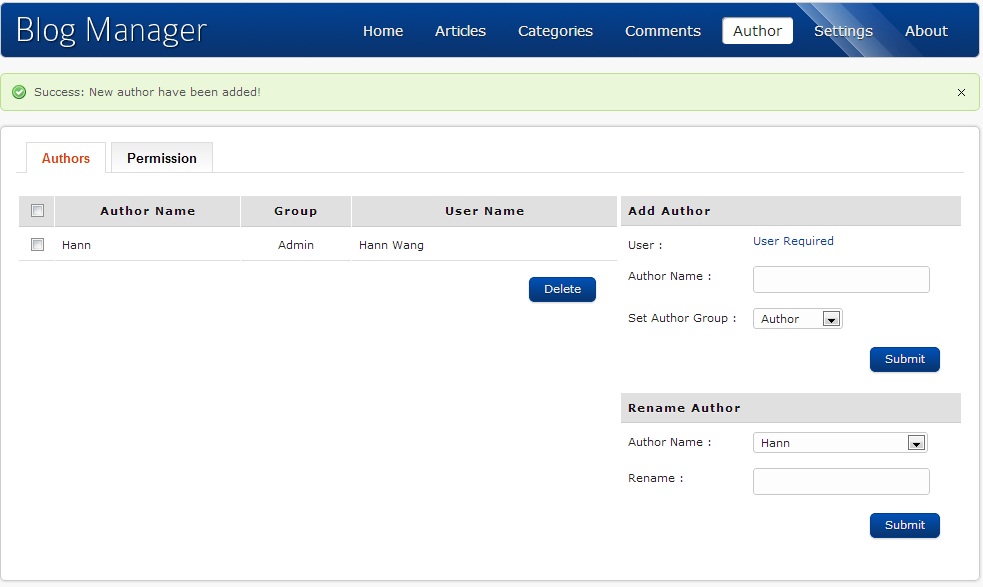
Add in an author name. This could be a real name or an alias but keep in mind that this will show up under the post title. Then you will be presented with the following dashboard:
The tabs at the top should be fairly straightforward and you can always play around with the actual Blog Manager demo to explore more on what they do.
5. Change Settings
The settings are the most important as this ultimately determines how your blog will be displayed along with other important things such as SEO. Let’s look at the tabs one at at time:
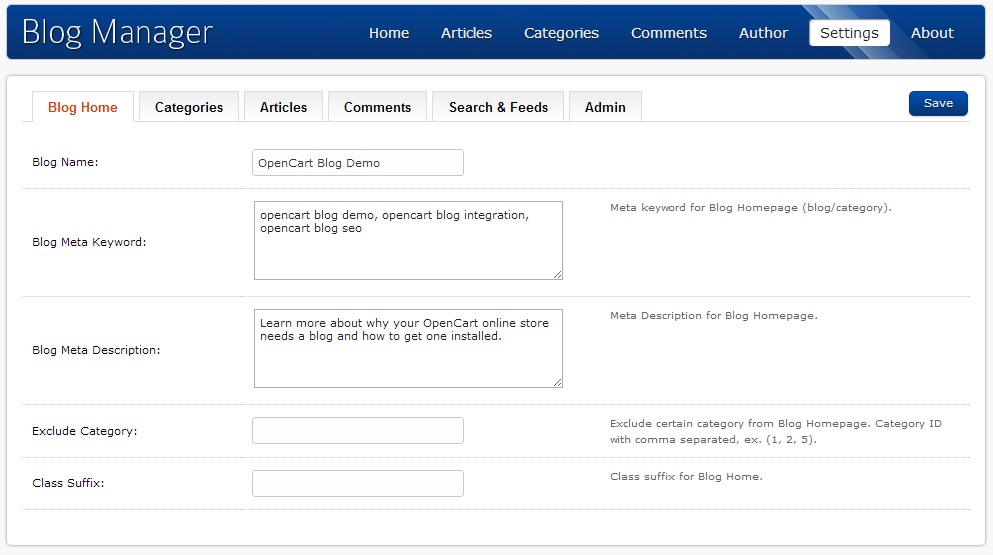
Blog Home
This is where you change the SEO values on the blog and how it appears in the search engines.
Blog Home: Put something here that describes your blog. Ideally, it should also include keyword phrases that you want to be found for in the search engines as this appears in the main title.
Blog Meta Keyword: No need to stuff keywords here. Only a few main keywords will do.
Blog Meta Description: This description is what shows up in the search engines but is generally limited to about 160 characters. This description should be carefully thought out as visitors will be more likely to click through to your website if there is a call to action along with a small benefit.
Exclude Category: If you want to exclude any categories from your blog, then put the category ID number here.
Class Suffix: This is a CSS field where you can define how your blog displays. I generally leave this blank but you could play around with the following settings:
imageBlock: show articles in one column with featured images.
blogCol2: show articles in two column layout.
blogCol3: show articles in a three column layout.
blogCol4: show articles in a four column layout
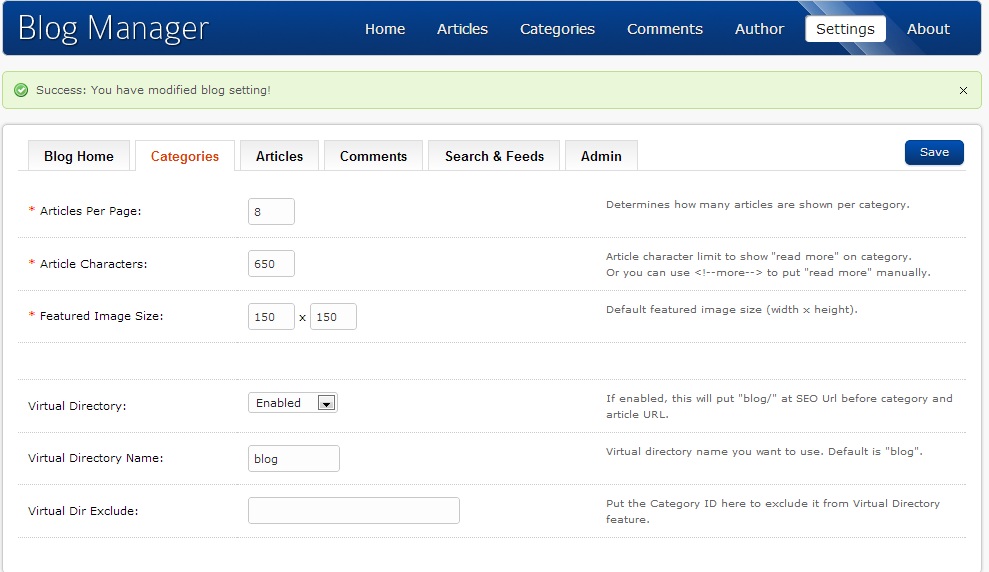
Categories
This is where you change settings related to Categories. I usually leave these settings to default but you can always change them here.
Articles Per Page: Changes how many articles are shown in a category.
Article Characters: Determines whether you want the entire article to show or just a snippet.
Featured Image Size: Changes the default image size.
Virtual Directory: Leave to Enabled as this puts articles into its own /blog directory.
Virtual Directory Name: Leave this to ‘blog’ as this is where visitors will see your blog (i.e. sitename.com/blog).
Virtual Dir Exclude: Put a Category ID number here to exclude it.
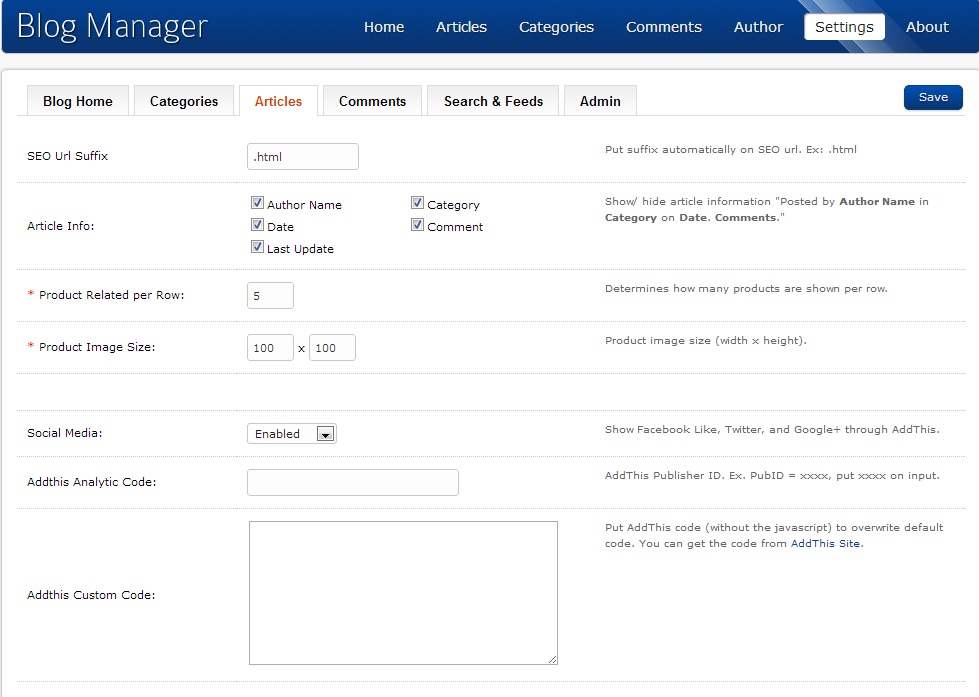
Articles
This is the tab where you change settings related to Articles and also where you can add in analytic codes for further tracking.
SEO URL Suffix: Determines how an article’s URL will appear. I like to leave this blank so my articles become something like: sitename.com/blog/this-is-an-article
Article Info: Determines what post information you want to appear in an article.
Product Related Per Row: One really cool feature about Blog Manager is that if you write an article that is related to any products, you can actually have it display under the content. This is perfect as it means that you can deliver free information to your visitors and then display products that they can then be able to purchase. This type of marketing is very effective and one that should be implemented immediately.
Product Image Size: Determines the size of product images.
Social Media: Leave to Enabled as others who read your content can be able to share it to Facebook, Twitter or Google Plus. A must have if you want to get your content spread to the right audience.
Addthis Analytic Code: If you have an account with addthis.com then put your code here
Addthis Custom Code: Grab your custom AddThis code to include even more social media sharing options.
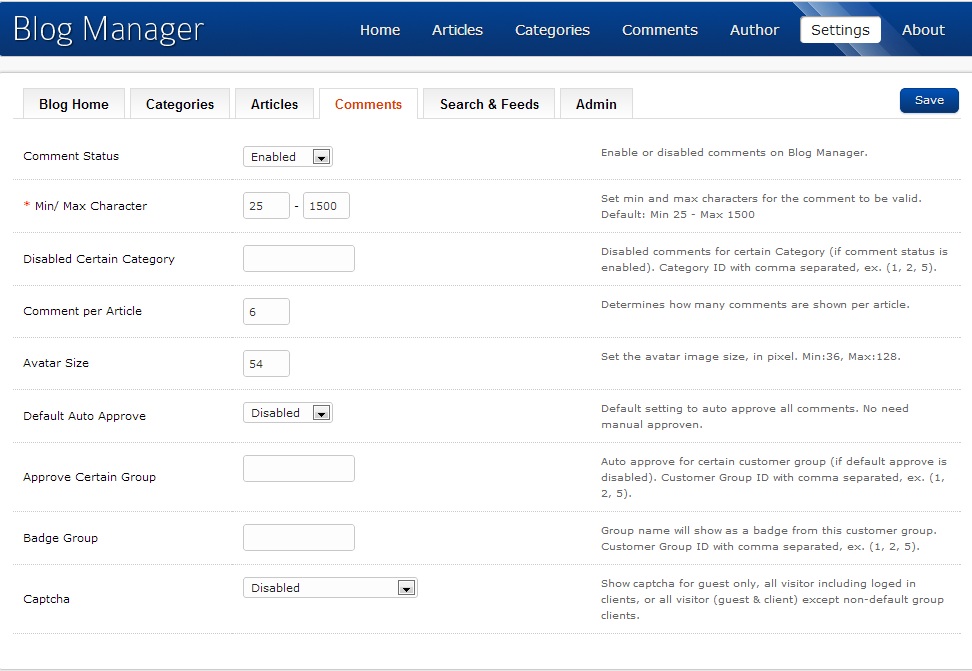
Comments
Change settings related to Comments on this tab.
Comment Status: Leave to Enabled if you want others to be able to comment on your content. This is a great way to interact with potential customers but you should also be monitoring it as well for spam.
Min/Max Character: Determines how much content you want allowed for comments.
Disabled Certain Category: If you don’t want others to be able to comment for articles in a certain category, then put that Category ID number here.
Comment Per Article: Determines how many comments you want to appear for each article.
Avatar Size: Sets the size of your avatar.
Default Auto Approve: Unless you want to auto approve comments, I would leave this to Disabled so that you can approve comments first before letting them go live on the site.
Approve Certain Group: If you have regular customers who comment on your content, then it would be a good idea to auto approve their comments.
Badge Group: To be honest, I’m not sure what this option does but the description says: “Group name will show as a badge from this customer group.”
Captcha: I would set this to Enabled for Guests Only. What this means is that if a visitor is not logged in, then they have to enter in a captcha code before they can comment. However, visitors who are logged in do not have to enter in this code.
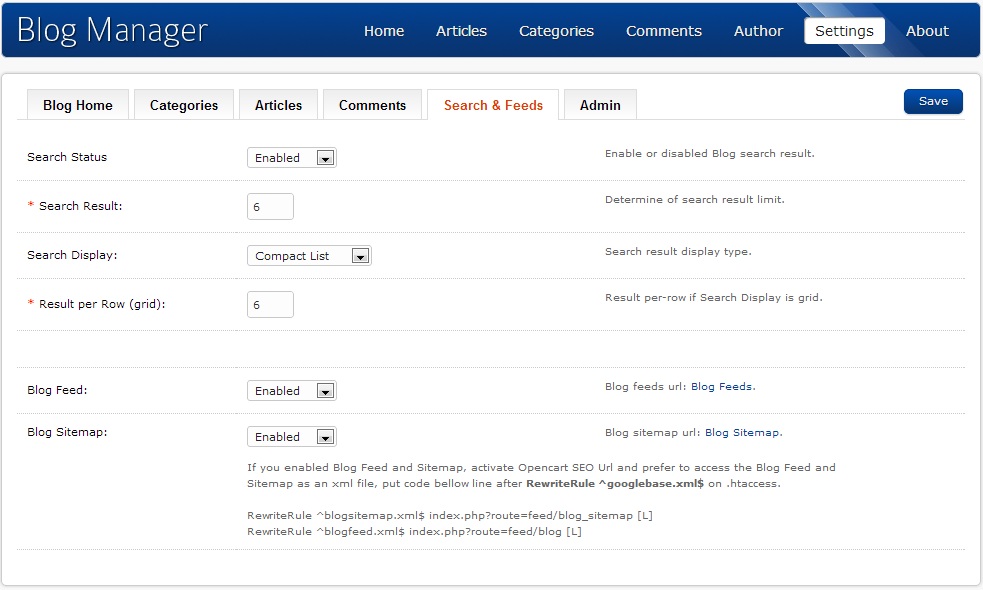
Search & Feeds
Change settings related to Search and the blog feed on this tab.
Search Status: I would leave this to Enabled. This means that visitors who use the search feature on your site will be able to see both products and articles that are related to their query.
Search Result: Determines how many results show up.
Search Display: Choose between Plain List, Compact List and Grid for how the results display.
Result Per Row (grid): This determines how many results show up if the Search Display option is set to Grid.
Blog Feed & Blog Sitemap: I would leave these options set to Enabled.
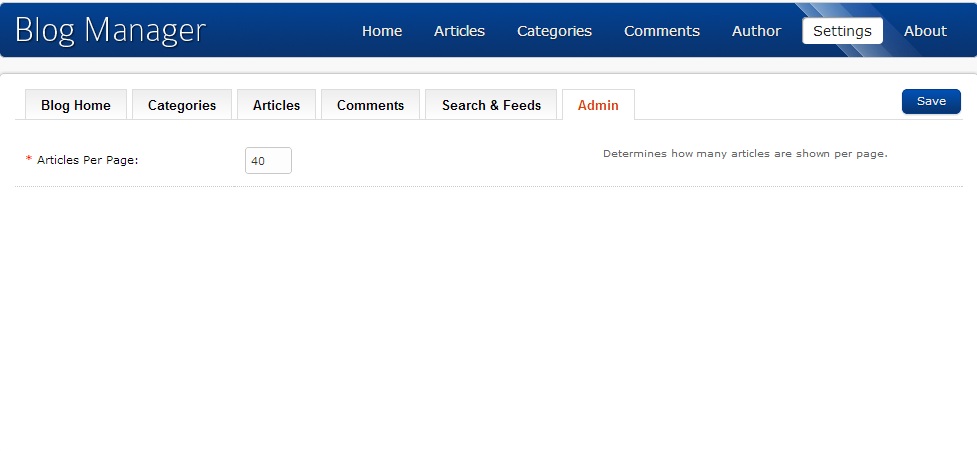
Admin
Change how many articles you want to appear per page in Admin.
Articles Per Page: Determines how many articles will appear in the main Articles tab where you go to create and edit content.
Once all your settings are saved, make sure to click the Save button otherwise your settings will simply revert back to their original settings.
6. Add a Blog Link to Your Home Page
Now that your settings are finally set, the next step is to add a link to your blog in the main navigation of your site. This makes it easy for others to click through to your blog for any updates or news that you may have published.
For this step, I’m assuming that you are using the default theme of OpenCart. Keep in mind that other premium themes such as Shoppica are different in terms of which files you need to edit to include a link to the top menu.
For the default theme, you’ll need to edit the header.tpl file using an FTP program which can be found by going to sitename.com > Catalog > View > Theme > Default > Template > Common > header.tpl
From your FTP file, simply copy it over to your computer as we will be editing that file with notepad.
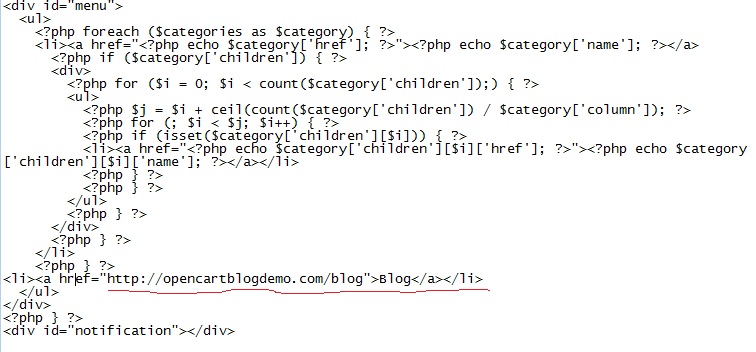
Find <div id=”menu”> and directly below </ul> add the following link:
<li><a href=”http://opencartblogdemo.com/blog”>Blog</a></li>
Obviously, replace the domain name with your site name.
This is what your code should look like:
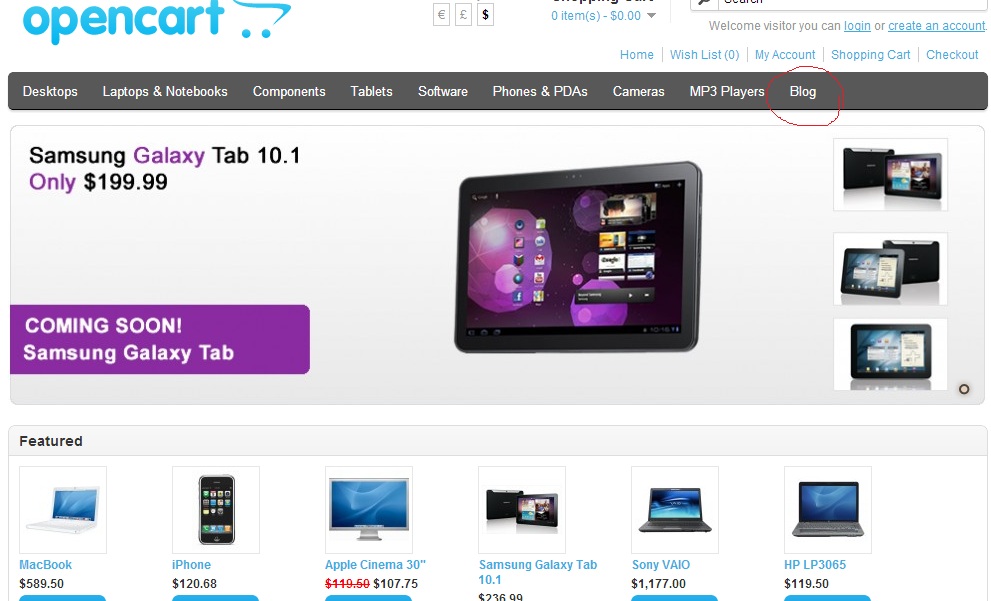
Then simply save and upload the file. The front page of your home page should now include a link to your blog at the top menu.
Let’s click it to see what we get:
Now our blog is finally installed and working! The best part is how well integrated the blog is with the rest of the site. While a WordPress blog could have been installed, it becomes its own entity and visitors will have to leave the site in order to read content on your site. This OpenCart blog integration is a perfect solution for integrating SEO content to your site while also providing value to your visitors.
Let’s go ahead and add in some dummy content so you can see how the process looks like. Then we’ll configure the content to include snippets on the homepage.
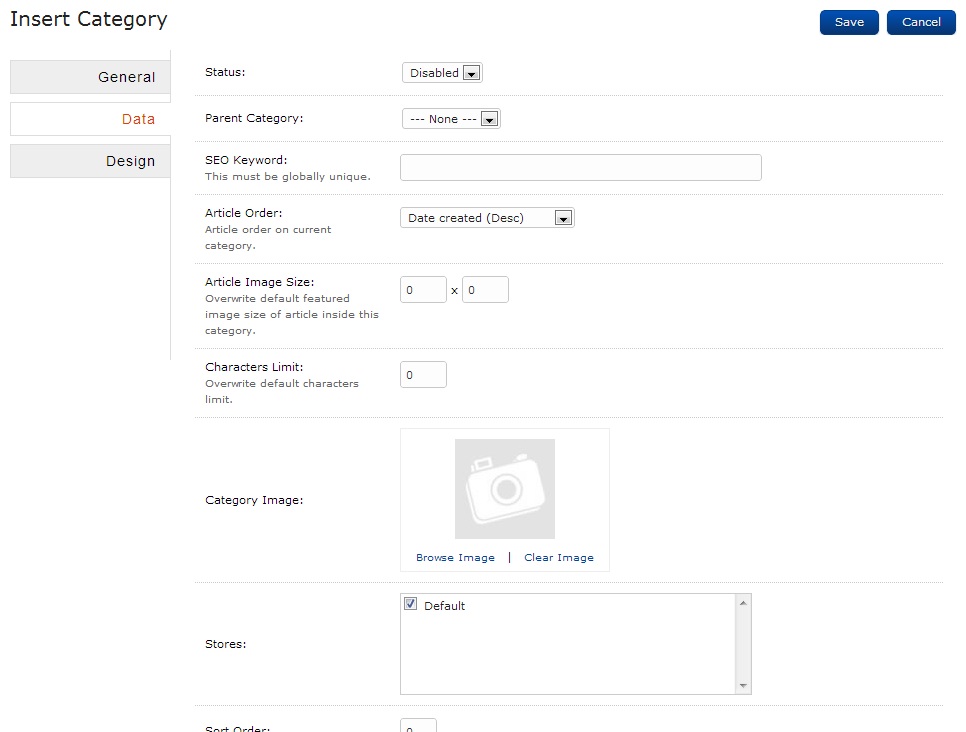
7. Add Categories
In your Blog Manager, click the Categories tab at the top. You can always make changes to this section later on but you should definitely think ahead in terms of what categories you want to create along with the type of content that you will be written or have written for you.
General
Category Name: Put the name of your category here. It’s always a good idea to separate your content into categories not only to make it easier for navigation purposes but also for SEO purposes as well.
Meta Tag Keywords: Insert the main target keywords of what your category will be about.
Meta Tag Description: This content appears in the search engines so make sure to really take the time to put some thought with what you write here.
Description: Add a few sentences about the main category including a brief overview. For example, if the name of the category is Weight Loss then you might want to include a short snippet about the importance of weight loss and what type of information is included in the category.
Data
Status: Change this option to Enabled.
Parent Category: Select this option if you would like to have subcategories for your content. This is especially beneficial for further organizing your content. For example, a category such as Weight Loss might have subcategories such as Exercises for Weight Loss or Weight Loss Diet.
SEO Keyword: Keep this short and simple. Make sure to use a dash and that other categories do not also share the same name. For the weight loss example, an SEO Keyword like ‘weight-loss’ would suffice.
Article Order: Most blogs generally display content in the order that they are created with the newest being on the home page while older content starts to get buried underneath new content. You can change the sort order here if you wish to.
Article Image Size: I would keep this to default as the setting here overwrites the featured images of the category.
Characters Limit: I would also keep this to default settings as this option overwrites the character limit.
Category Image: Put an image here that clearly defines your category.
Stores: Leave to Default.
Sort Order: You can change the order of how the categories are displayed by inputting a number here.
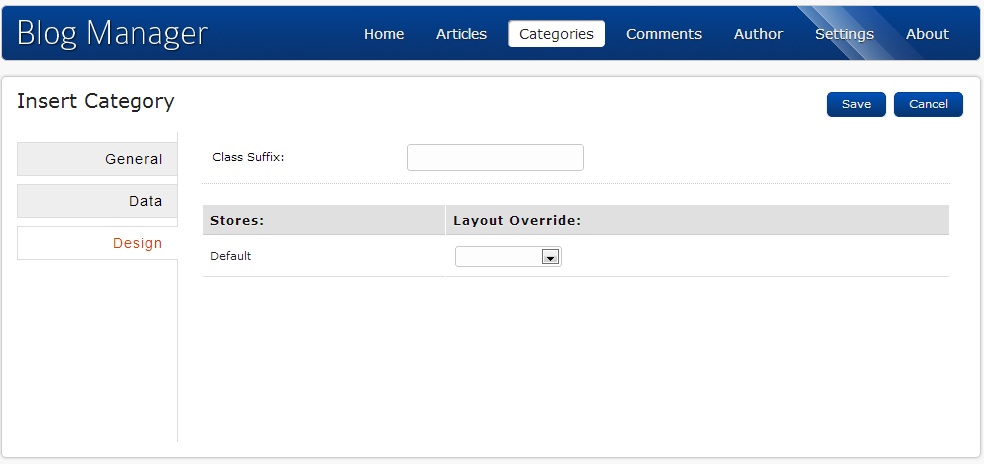
Design
Class Suffix: This is a CSS class input field where you can change settings such as whether you want it to display in columns or not. Leave this field blank if you like the standard layout of the blog.
Default: I would leave this to default unless you have a reason for changing it.
8. Add Content
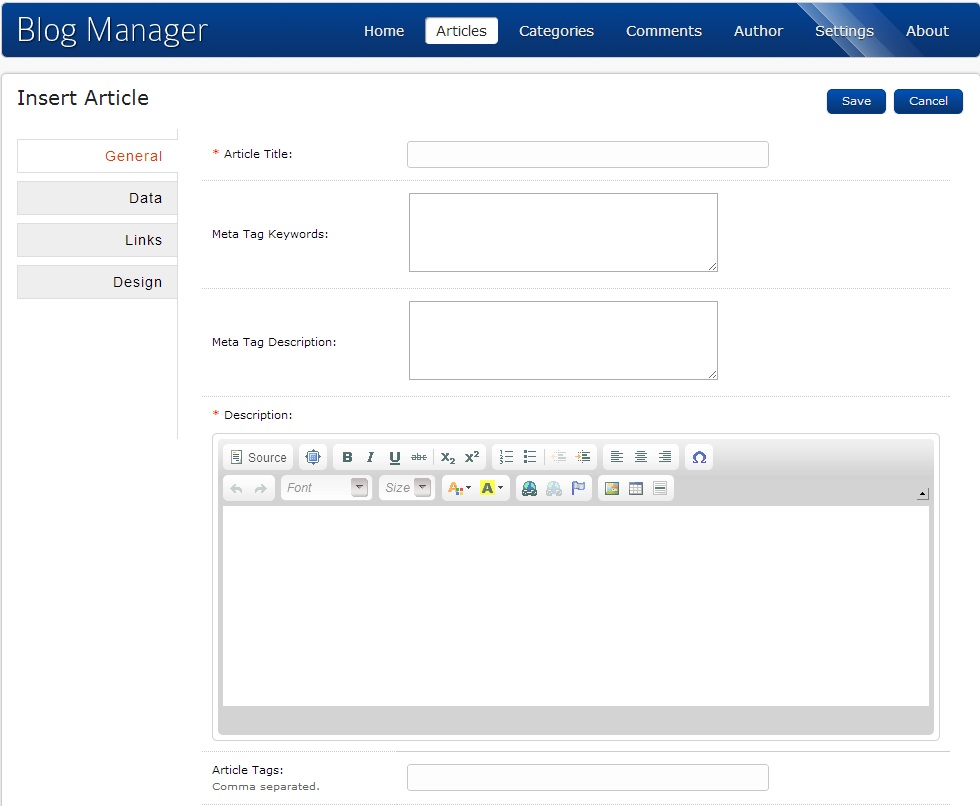
In your Blog Manager, click the Article tab at the top then click Insert. Here’s where you insert your content.
General
Article Title: Put the name of the article in here. Ideally, this should include targeted keywords as this will help to draw in traffic from the search engines. It should also act as a headline to get visitors to click through. For example, a title like “How to Implement SEO Content Writing to Increase Online Sales” would be much better than a title like “SEO Writing Benefits”.
Meta Keywords: Enter in the main keywords that your content is targeted around. There’s no need to stuff keywords here as only a few will be plenty. For the most part, search engines mostly ignore this information but it doesn’t hurt either to include relevant keywords.
Meta Description: This is the description that shows up in the search engines when a query from a visitor is made. Make yours appealing by giving a brief summary of the content along with a call to action to click through. Just this one step will help your listing stand out as most people don’t even bother with this step.
Description: This is where the main content of the article goes in. I recommend articles that are more than 500 words. I cannot stress enough the quality of your content. Sure you might be able to hire writers who are willing to write such pieces for $5 but just remember that you get what you pay for.
Well written content that provides value to visitors is exactly the kind of content which gets shared through social media networks such as Facebook and Twitter. It is also the type of content that helps to bring search engine traffic which ultimately leads to new sales and leads.
Be sure to also insert an image here by clicking the Image icon and clicking the Browse Server. Upload the photo and change the dimensions as necessary. For better alignment, I suggest making the image aligned to the left although you could do it to the right as well.
Article Tags: Most blogs now have a tagging feature that allow you to tag content with certain keywords. This works in much the same way as categories. For example, visitors can be able to view all content based around certain tags. If you have a fitness blog then tagging content related to weight loss with certain keywords will help others be able to find all the articles that you have written which are related to that phrase.
Data
Status: Change to Enabled for the content to show up.
SEO Keyword: Make sure that your title is separated by a dash and make it shorter if you have a really long title. The name of my article as an example is an-example-article-written-for-opencart
Change Author To: Change this option if you have multiple authors and want to specify one.
Created Date: The date the article was created.
Modified Date: The date the article was modified.
Start Publishing: Here you can choose when you want to publish the article whether you want to do so immediately or want to schedule it in the future.
Featured Image: Articles that have pictures are always much more appealing than those without. A small thumbnail image will appear next to the content title if you have the Recent Articles or Popular Articles modules turned on. One thing to mention is that if you want the image to appear in the actual content, you’ll need to insert it in the Description field in the General tab.
Sort Order: Determines the order of the articles published.
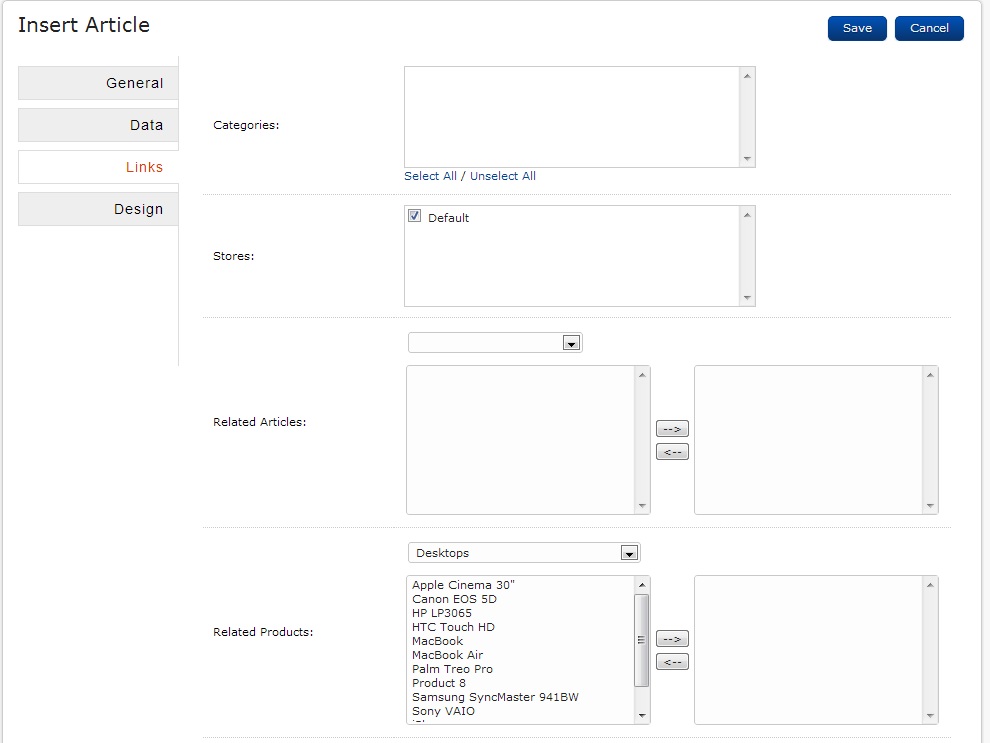
Links
Categories: If your article falls under a certain category, select it here.
Stores: Leave to default.
Related Articles: One really cool feature about the OpenCart Blog Manager is that links to related articles can be displayed under the content. This is especially beneficial for visitors as it means that they can explore other articles that are related to what they are currently reading.
Related Products: If your article is related to a certain product that you carry, then you should absolutely select them here. Just imagine reading an article about computer stereo systems and then below that you see links to the exact products that were mentioned in the article.
Wouldn’t that make you more likely to click through and perhaps make a purchase? Providing valuable content builds trust with new customers so if you deliver remarkable content, new customers are more likely to shop with your business. Be sure to select a few options here, three to five would be sufficient.
For the Design tab, I would leave the settings to default. When you are done with the article, be sure to save. If you click away, the content may not save so I would strongly suggest that you backup your data or use a word processor to write your content before uploading.
I added in two additional articles to show how the blog page looks from a visitor standpoint of view:
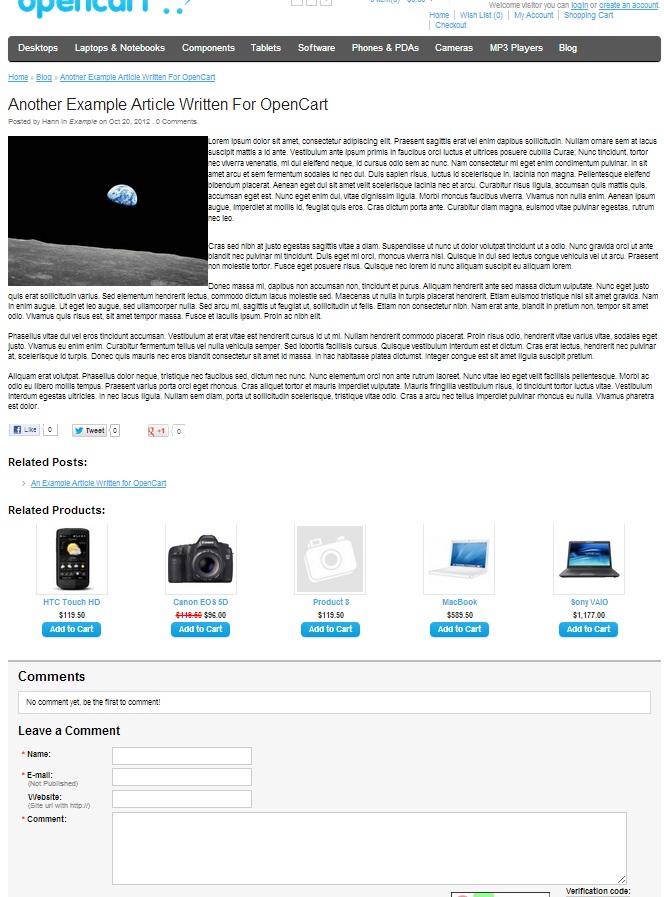
And here’s how the actual article page looks like. I had to shrink the page to be able to fit everything:
The way OpenCart Blog Manager integrates content into the actual site is amazing and everything looks beautiful. The social sharing buttons make it easy for visitors to share the content through their favorite networks, the links to related articles help visitors explore new content, the links to related products enable visitors to purchase directly from your store and the comments section even allow others to interact with the store owner.
There’s one final step left.
9. Add Content Modules
The best way for people to find your content is to have links to it from your home page or to link to them from the sidebar. To do that, we’ll need to install some additional modules.
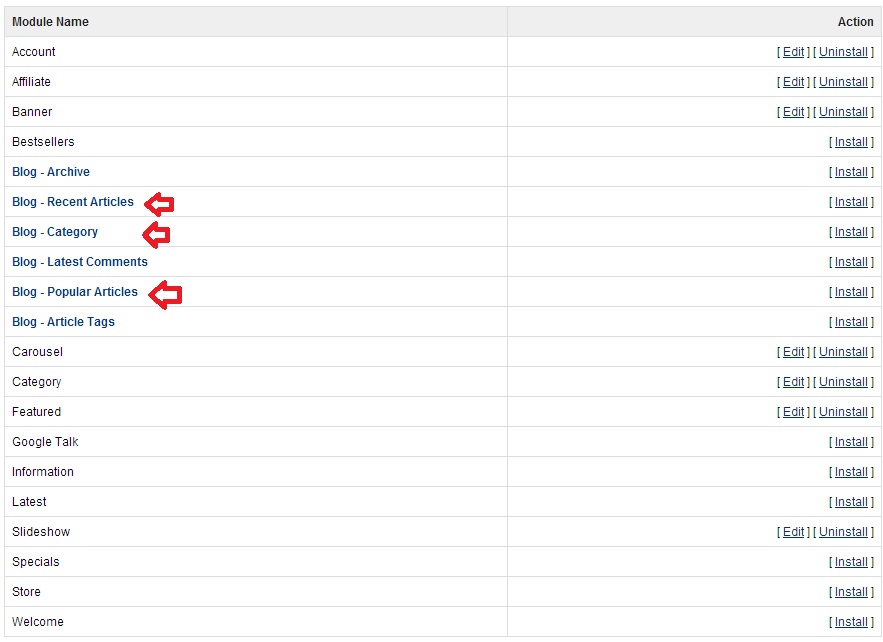
Go to Extensions > Modules
Let’s go ahead and install the Recent Articles, Category and Popular Articles modules by clicking on Install to the right of them. If you would like to include links to the Archive, Comments, or Article Tags then you can easily do so here.
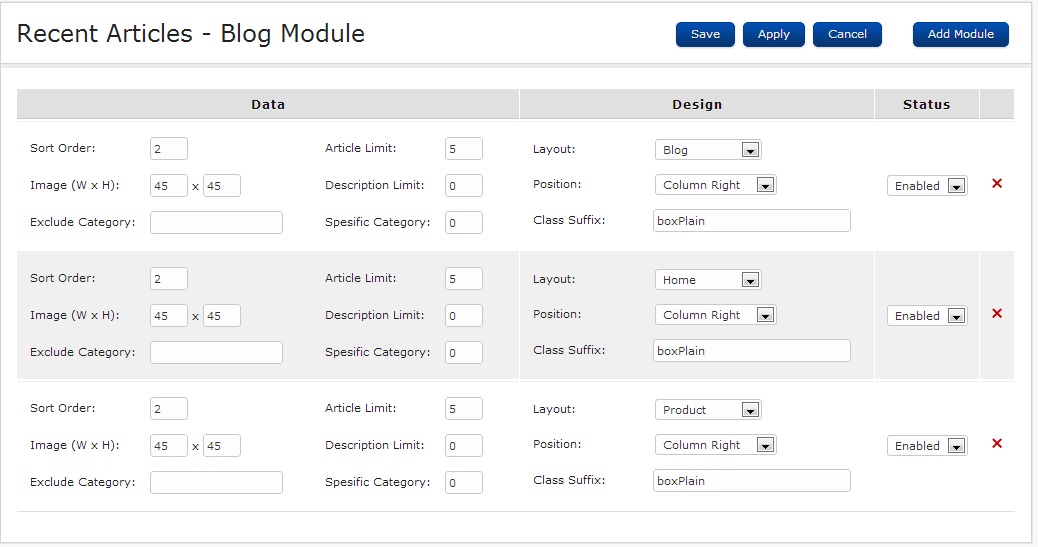
To the right of the Recent Articles module, click Edit and then click Add Module.
Sort Order: Determines the order of how the modules appear.
Image: Change the image width and height here.
Exclude Category: Insert a category ID number here if you want to exclude it from appearing.
Article Limit: Determines the number of articles to show
Description Limit: If you want to put a short blub of the article, then put a limit here.
Specific Category: Put a category ID number here if you want to display articles from that category only.
Layout: Determines where the articles will appear. Go ahead and select Blog as that’s where we want it to appear.
Position: Determines where to place the module. Go ahead and put it in Column Right.
Class Suffix: CSS field input which determines how it looks. Leave it at its default value of boxPlain.
Status: Leave to Enabled.
Keep in mind that if you want this module to appear in multiple locations, such as if you want it on the Home page, Product page and the Blog page, you’ll need to create multiple instances of it and change the settings accordingly.
Here’s how mine looks like:
Then I did the same for the Category and Popular Articles module.
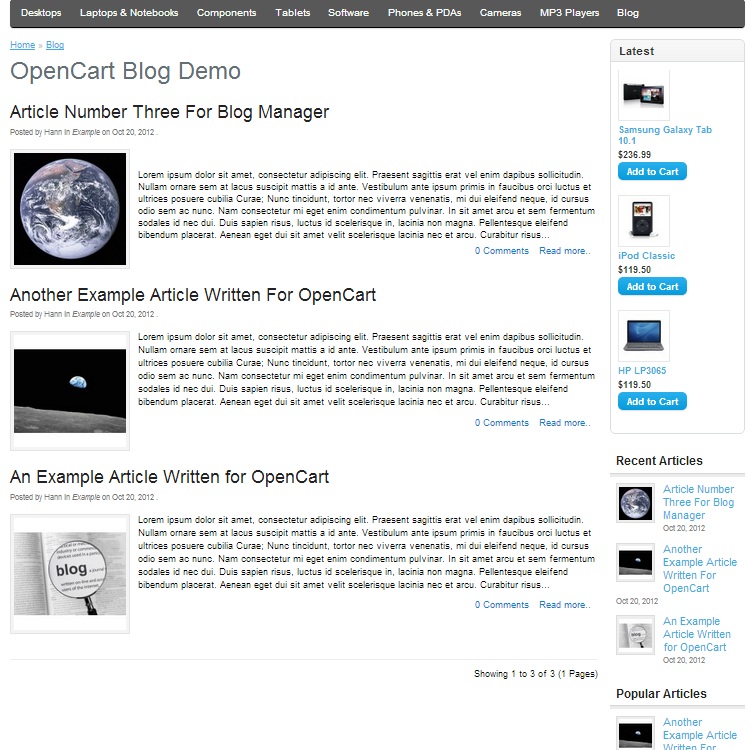
Here’s what the blog page looks like now:
Notice that the blog page has a Latest products module to the top right. That’s another module that you can easily install and edit. I just included that as a way to highlight new products from the store although you can also install the Bestsellers or Specials module if you wish.
Here are links to the blog demo of how the store looks with the new Blog Manager installed:
Just note that you may have to play around with the module settings so you can get it to how you want it to look. In this case, I disabled the Slideshow module so the Latest Products, Recent Articles, Popular Articles and Category modules could be properly formatted on the home page.
10. Never Stop Adding Content
 That concludes the end of this OpenCart blog integration tutorial. Now that you know how to install one for yourself (with these awesome instructions), I would strongly suggest that you add a blog to your own online store.
Having a blog is a great way to drive search engine traffic, increase rankings for target keywords, interact with your customers and increase sales.
Ideally, you should be posting content to your blog on a regular basis. You might be thinking to yourself, “Well, that’s great and all, but what do I actually write about?” Depending on your niche and what products you sell, there are tons of post ideas.
For example, you can blog about:
- New products that you have added to the store
- Which products you personally recommend
- Comparisons between different types of products
- The benefits of your products
- How to do something
- Current events related to your niche
- Success stories of others who have used your product or service
- Interviews you have done with important people in your field
- Tips to doing something
- Your opinions about a relevant topic
- Case studies
This is just a short outline of post ideas you can write about for your blog. There are many more creative topics that you can write about but the point is to keep with a regular writing schedule as this will help to build your online brand as well as establish authority with the search engines.
Hire Me as Your SEO Content Writer
I pride myself on writing high quality content at reasonable prices with quick turnaround times. Writing simple articles around one keyword simply doesn’t cut it these days. I believe that the best way to write content is to first write valuable content for your audience and then include relevant keyword phrases to boost online traffic through the search engines.
[contact-form-7 id=”82″ title=”Contact form 1″]









Leave a Reply
Want to join the discussion?Feel free to contribute!